Posted in General, Second Life, tips

Show Me the Money! – getting more L$ for your US$

[First published 20-Mar-2012, updated 05-Jul-2017]]

You know how it is; you’re out shopping, you don’t have enough L$, so your cursor heads up to that familiar button in the top right of the screen labelled “Buy L$”. It’s so easy, it’s so convenient, and it’s so quick.

But, wait! That convenience comes at a price. You are buying L$ at whatever rate Linden Lab feel like giving you, and that’s not the best rate.

What do I mean by rate? Well, when you go abroad you often convert some of your normal currency into the currency used by the country you’re going to visit, and you are offered an exchange rate. In other words you buy some of that currency, just like you might purchase any other service or ‘thing’. And, just like buying anything, different people have different prices and it is a good idea to shop around for the best price.
It’s not just limited to people going on holiday either – there’s a whole area of Finance called “Foreign Exchange” (often abbreviated to ForEx or FX) that deals with this.

It’s a less-known fact that Second Life has its own little Foreign Exchange Market, called the Linden Exchange (or LindeX for short) which is accessed via the Second Life website.
Here people buy and sell L$ using US$. And it is here where you can get more L$ for your US$.

So, how does this differ from the good old in-world “Buy L$” button on your Viewer? Well, it’s way less convenient I will admit, although I find it kind of fun! But you have the reward of getting more L$ for your US dollars by being able to shop for the best price, which is what it’s all about.

Instead of just converting US$ to L$, you offer to buy L$ for a certain amount of US$. This is known as a Limit Buy which is a conditional purchase. You are offering to buy L$ from one or more people who are selling for a certain price or better. On the LindeX your offer will stay open until it is either ‘Filled’ (ie. the transaction completes successfully) or until you cancel it.
Depending on how aggressive your Offer Price is, how long it takes to fill could be measured in seconds, minutes, hours, days or never! Also, for larger purchases, you may get a partial fill, which is when more than one seller fulfils part of your order as no single seller is selling at the price you want to pay in the quantity you want to buy. The remaining unfilled amount keeps the order open until all of the order fills.

(If you’re interested in further reading, then some of the basics of ForEx are available here, although it is in no way needed and I only provide it for your interest because I think I’ve covered enough here already)

“Enough with the waffle, Becca. Just tell me how to do it!”, I hear you saying. Well, ok, if you insist.
Continue reading “Show Me the Money! – getting more L$ for your US$”

Posted in General, Opinion, Second Life, tips

You do not see what I see

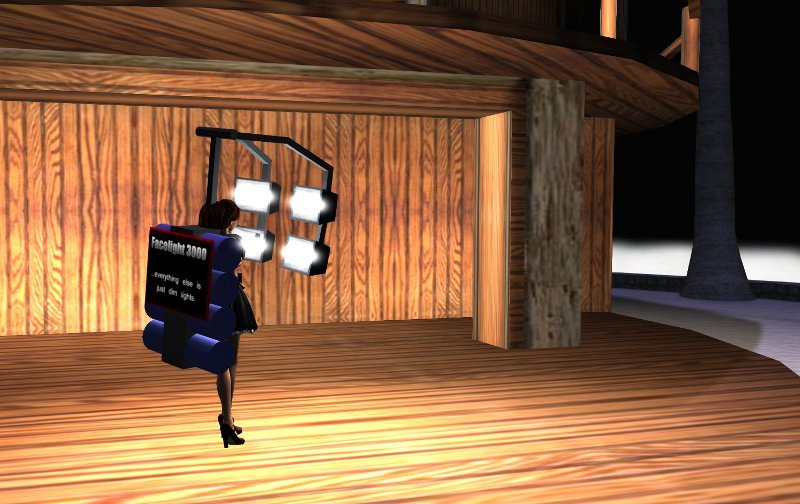
Gahh! My eyes!
Facelight3000 - everything else is dim lights

Graphics in Second Life Viewers just keep getting better and better. The trouble is, as things improve and we get new technologies, it’s inevitable that older technology is going to work less well or even break.

Several older technologies are currently showing issues – such as system skirts casting an incorrect shadow, likewise invisiprims not working properly any more on the highest graphics settings.

The one that affects me the most, though, are people wearing insanely bright facelights.

Continue reading “You do not see what I see”

Posted in General, Opinion, Second Life, tips

I am not a bowling pin

Another in my series of hints and tips for Second Life. This one is very short and simple.

Have you ever been in a crowded sim, say at a club or a music venue, and somebody TPs in and then, without waiting for anything to rezz, just bulldozes through everyone before (if you’re lucky) they say in open chat “sorry if I barged anyone”?

This can easily be avoided.

Continue reading “I am not a bowling pin”

Posted in Second Life, tips, Viewers

Oh no! I deleted half my house! (and other disasters)


[NOTE: This is very out of date now that we no longer have prim link sets and most things are mesh instead]

A friend recently IMed me with exactly that. And, to be fair, most of us have been there. But don’t panic, and all is not lost.

Likewise do not panic if you accidentally moved something. Or if you rezzed something and exceeded your prim count and half your house got returned to you instead (that happened to me once), or your landlady had a blonde moment and returned half your stuff (happened to me also).

Here are some handy hints on what you can do in each circumstance.


You moved something

If you’ve moved something by accident the first thing you should do, if your Viewer supports it, is to hit Ctrl-Z which is the shortcut key for “undo”. Very often this will snap things back exactly as they were.
Phoenix and Firestorm both have this functionality, and doubtless many other Viewers do too.

However, this does not always work. So you will have to move it back manually. Now your first inclination will be to grab the object and start dragging it around but this is the worst thing you can do as, trust me, you will not get it back to exactly where it was. Oh, sure, it may be “good enough” and that’s fine. But then you wouldn’t be reading this if you were happy with just that. Besides, in the case of segments of a house it will not look right unless correct down to the smallest decimal point.
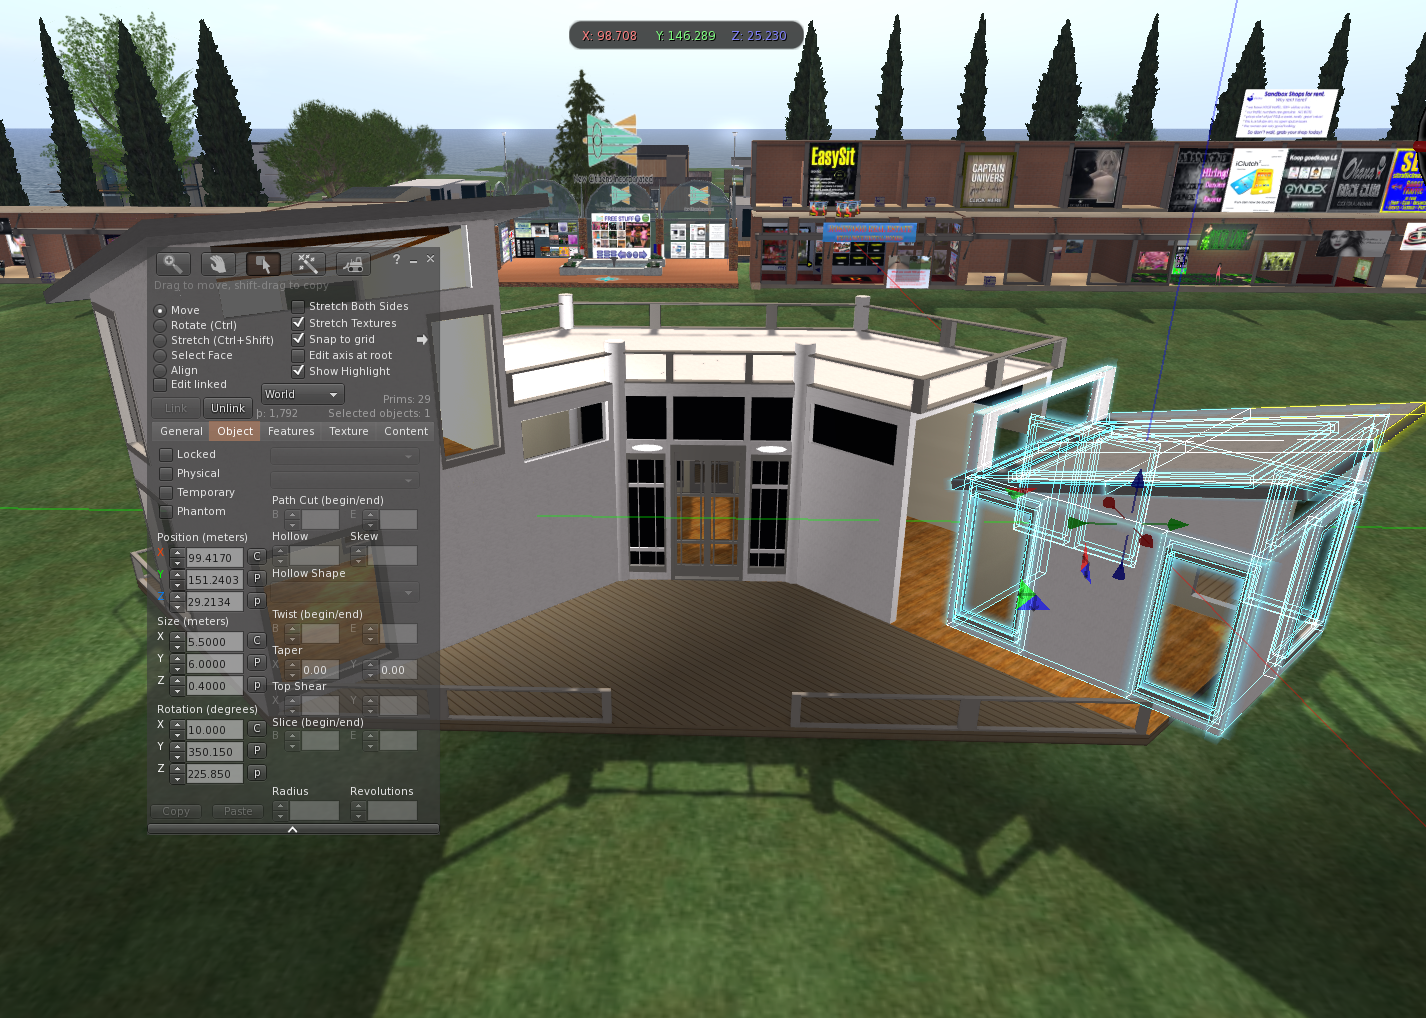
What you need to do it right-click on the object, select Edit, and then choose the Object tab. If you look at the screenshot above you can see what I mean. I was running Firestorm Viewer so if you’re using a different Viewer it might look slightly different.
If you look on that you’ll see all the numbers for the exact placement of the object. Now, with some rezzboxes (the box that rezzed your house) they add the exact position co-ordinates of when they were rezzed to the description field. So if that’s the case then you’re sorted as you can manually set them back to the correct value. They will very likely write the X, Y and Z values as , eg. <105.83778, 146.98111, 35.75515>
If not, you may be able to deduce the settings by looking at surrounding objects. This is often hard though.
One sure-fire way, albeit rather tedious, is to rezz a copy of the house (you may need to go to a sandbox if you have insufficient prims to do that) and examine the values of the offending segment and also those of an adjacent one, and with some very simple maths deduce the offset of one to the other. Then return to your proper house and apply the same offsets, thus returning the moved segment to its correct position. So if, for example, SegmentA is at 100,100,100 and Segment B is at 100,110,100 on the new house, and on the proper house SegmentA is at 200,200,100 then SegmentB should be at 200,210,100 because there is an offset of 10 on the Y co-ordinate.
I find that using a simple spreadsheet to do this helps enormously. If there is enough demand I could make one available.

Finally, prevention is better than cure. Once you have things back the way you want, be sure to lock the object. All this does is mean you can’t accidentally move it again until you unlock it; it’s just like the safety catch on a gun. You’ll find a tick box to lock & unlock objects on the same tab as all the numbers we’ve been looking at – it’s called “Locked”.


You deleted something

First thing to do is to find it in your inventory, and it will be in your Trash.
Note the name of the object, then right-click on it and choose “Restore” to undelete it. Do NOT click “Purge”!!
Then find the object again (searching for it by name if necessary) and see what menu options are available. On some Viewers there is the option to “Restore to last position”. Phoenix and Firestorm definitely have this, and I’m sure many other Viewers do too. If that is the case then use this option and you will very likely find the object restored to its correct place. However, I disclaim all responsibility if for some reason it doesn’t, especially if it is a no-copy item that disappears into the far blue yonder never to be seen again. You have been warned.
The other option is to just rezz the object in approximately the correct place and then use the techniques mentioned earlier for moved objects (although obviously not the first one to do with “Undo”)


You had something returned

First thing to do is to find it in your inventory, and it will be in your Lost & Found. Something worth bearing in mind is that if a large number of objects are returned to you, SL may package them up. You will find what looks like just one of your objects but it will have an icon that looks like a pile of building blocks rather than the normal icon for an object which is a box. Rezzing this will rezz all the returned objects inside the package, although possibly in the wrong place. But at least they will be rezzed in the correct relative positions to each other so it should be a case of calculating the offset to their correct position (as I outlined earlier) and then moving them.
However, if it is just one object, and not a package, then use the same technique as outlined above for deleted objects.

Posted in Photography, Second Life, tips

Second Life Photography tips

Update: Although this is an old article, it is still relevant in 2022!

As many of you know, I’m a keen Second Life amateur photographer with loads of pics on my Flickr photostream and even more on my self-hosted gallery.

Along the way I have picked up a few useful techniques which I will share with you here.

First things first, if you haven’t read SL Wiki guide to high quality photography then you should have a read. Specifically on turning on the High Resolution Snapshots option and also Quiet Snapshots to Disk (which disables that annoying “click-whirr” sound effect that lets everyone know you have taken a pic)

As mentioned in the guide, whilst you can use the Camera Controls window (View -> Camera Controls) to control the camera, it’s very clumsy and imprecise. It is far better to use the mouse camera controls, as follows:

  • Alt and clicking something focuses it to the centre of the screen.
  • Alt and dragging the mouse zooms the camera.
  • Alt+Ctrl and dragging orbits the camera.
  • Alt+Ctrl+Shift and dragging pans the camera.

That may sound a little complex, but when you get used to it then it is amazingly intuitive and fast. It’s so natural to me now that I don’t even think of it when I use it.

Now, on to my tips.

Shoot from the hip

The first thing I use a lot, and I mean a LOT, is a technique that lets you shoot first and aim afterwards. As a Street Photographer who is always looking to capture that split-second ‘sneak attack’ moment this is really essential.

Take a snapshot using the Snapshot button on the bottom menu bar (on a 1.x Viewer) or use the keyboard shortcut Ctrl+Shift+S (under Windows). This brings up the Snapshot Preview window.
For my technique to work you must have the “Freeze frame (fullscreen preview)” checkbox ticked. And you should NOT have the “Auto-refresh” checkbox ticked.

So, with those checkboxes set up that way, take a snapshot and note that everything seems to be frozen in time. Now, move the camera around using the mouse controls I mentioned earlier… Yay! We have ‘Bullet Time’ from The Matrix!
Use the camera controls to reposition the camera angle so that everything is just how you want it and then click the “Refresh Snapshot” button. You can then save as normal.

Under some circumstances when taking snapshots of people, SL can glitch up and the person can move but all their attachments (including their hair) can stay still and it ruins the snapshot, but it happens rarely enough that this technique is still very useful.

The Dolly Zoom

If you know anything about film, you’ll be wondering what the Dolly Zoom (a.k.a. the “Hitchcock zoom”, “Vertigo effect”, “Jaws shot”, “zoom in / dolly out“, etc.) has to do with stills photography, but bear with me.

If you zoom right in on something in Second Life you’ll notice that everything gets a bit distorted and perspective is altered.
Now, not many people know that there are additional zoom controls accessed with the keyboard shortcuts Ctrl+0 (to zoom in) and Ctrl+8 to zoom out. Ctrl+9 resets it to normal.

One or two presses of Ctrl+0 will correct the distortion.

But there is more! And this is where the Dolly Zoom effect comes in. If you get a bit more extreme and press Ctrl+0 a few more times and then pull back with the Camera Controls (Alt+mouse as previously mentioned) then you get the characteristic foreshortening effect. This can give you some really interesting effects.

Don’t forget that when you are done to use Ctrl-9 to reset to normal.

Posted in General, Imprudence, Phoenix / Firestorm, Photography, Second Life, tips, Viewer 2.x, Viewers

Profile pics and profile Picks (a tutorial)

A lot of people who have made their own picture for their Profile find that it appears squashed or stretched. There is a very good reason for this and it is fairly straightforward to work around. The aim of this post is to try to explain how.

Before I go any further though, do bear in mind that this whole tutorial is all to do with 1.x Series Viewers (ie. official Viewer up to 1.23.5 and most Third Party Viewers such as Imprudence, Phoenix, Emergence, and the like) since Linden Lab in their infinite (lack of) wisdom changed it for Viewer 2.

The key thing to remember with textures (which is the name Linden Lab uses to refer to anything that looks like a picture, which includes snapshots) is that they are always square or else rectangles made up of squares. And those squares are always powers of 2. So a texture can be 256×256 pixels, 512×512, 1024×1024, 512×1024, 512×256, etc. – you get the idea. The maximum size allowed in any one direction (in Second Life) is 1024.
If a picture does not fit into one of these combinations then it is stretched or squashed accordingly, and this is where the deformation comes from.

You would think that you should be able to just take a snapshot in-world and use it, however this is not the case because the Profile picture, and the picture used in the Picks section of your profile, have specific aspect ratios which are clearly defined by Linden Lab [link]. For your Profile pic this aspect is 4:3, and for a Profile Pick this is 16:9 (for 1.x Viewers. For 2.x Viewers LL changed it to 1:1 and 8:5/5:3 respectively. Don’t even get me started on why the Picks have two aspect ratios in the 2.x Viewer).
If you’re unsure what I mean by “aspect ratio” then please refer to [this link].
Unless you can somehow capture your in-world snapshot at something close to the correct ratio, then it’s not going to look right.
(I should note at this point that the RL pic in your profile has a 1:1 ratio, which since it is square is so trivially easy to do that I won’t mention it further)

So, how do you get it right? Well, provided you are happy to do a little bit of simple post-production then it is quite easy.
In order to do it you’ll need a photo editing application such as Photoshop, GIMP, Paint.net or even an online service like Picnik. All except Photoshop are free so don’t be worried if you don’t have one of them. I’ll leave it to you to choose what to use. I use GIMP myself, because it is almost as powerful as Photoshop but is free and Photoshop is very expensive. However, if you are a beginner then paint.net is a lot easier and more intuitive.

First you’ll need to take your snapshot in Second Life. Take a snapshot, but instead of saving it in-world, save it to your hard drive.
In v1.x viewers then this can easily be done with the Snapshot dialog, assessed with the “snapshot” button on the bottom toolbar (or the Ctrl-Alt-S keyboard shortcut if you’re using Windows). There is a radio button under ‘Snapshot destination’ at the top of the dialog, one option of which is “Save to your hard drive”.
You can also use “Snapshot to Disk” from the File menu.
Save the snapshot to somewhere that you can find it again shortly.

If you already have a snapshot in-world which you want to use then it is possible to save it locally and use it. Provided it has full permissions, you can open it and then choose “File -> Save Texture As” from the top menu (which is slightly counter-intuitive as you might reasonably expect it to be a menu on the window of the snapshot itself)

Now fire up your photo editing software and open the picture you just saved (regardless of which of the above two methods you used to create it).
Select the crop tool and fix the aspect ratio. In GIMP this is a checkbox on the crop tool and an edit box to specify the ratio. Your mileage my vary.
For a Profile pic you’ll want 4:3 and for a Pick you’ll want 16:9.
Don’t worry at this point what the final image size is because we will be resizing it.

Crop the picture to the correct ratio. It’s up to you how you want this to look, and it depends on your picture, but do remember that when someone looks at your profile the picture can look quite small. So, for your main profile pic at least, I find it is best to close crop and get your face quite dominant in the picture since your Profile picture is meant to be about you. However it’s entirely your call, of course.

Now, this is the important bit; the trick that this whole entry is about is coming up. You want to resize the picture so that it looks squashed, so that when SL uses it and stretches it, it regains its correct Aspect Ratio. Sneaky, huh?
You can do this in one step, but I like to do it in two steps as it makes more sense to me.
Resize your picture, preserving the aspect ratio. You’ll want to set the height of the picture to be either 512 or 1024 and let your software work out the width.
You’ll notice that the picture still looks right. Which is what we want.
Now the sneaky part – size the picture again but this time turn off keeping the correct aspect ratio. In GIMP this is a little icon of a chain between the height and width. Now set the width to be the same as the height. Do not change the height.
Your picture will now look squashed. Don’t worry, this is fine!
Save your picture – I’d recommend to a different filename.

Now, we need to get the picture back into SL as a texture.

Fire up your SL Viewer and, when ready, upload your edited picture (it’s under the File menu). It will cost you L$10 to do this. It’ll probably end up in the Textures folder of your Inventory.

Finally, edit your profile and drag the texture (ie. your uploaded picture) onto the appropriate picture box of the profile. Or, alternatively, double-click on the picture box and browse for it.

Hopefully your picture will look correct again – it will have been stretched out to the correct aspect ratio again. If it has not you’ve probably used the wrong ratio for the wrong box. Remember, for your main picture it should be 4:3 and for a Pick it should be 16:9
Also, bear in mind that it will only look right on 1.x Viewers since Viewer 2 uses different ratios.

That’s it! I hope that this was useful to you.

Posted in General, Second Life, tips

Top Tip: Disable scripts on items that don’t need them

Lots of clothes are now coming with standard resizer scripts, which include the ability to delete the scripts when you have fitted them right. This reduces lag and is a really good idea, although you should always make sure that you have a backup copy first. Never do this on your only copy if you ever plan to change your shape!

But what if you have a no-copy outfit like the amazing full-prim outfits from Feral Spirit by Melanie Jaehun? You have a problem, because you can’t make a backup and you don’t want to delete the scripts in your only copy of the outfit.

Melanie made the excellent suggestion that, for objects that are no-copy but are mod, you can disable the scripts instead. With 1.x Viewers (eg. Phonenix, Imprudence, etc.) you go to the Tools menu and select “Set Scripts to Not Running in Selection” for each object. This will have the same lag-reducing benefits as removing the script, but without losing the ability to re-enable it and run it again in the future.

Thanks for the tip, Melanie!

Posted in Flickr, Photography, Second Life, tips

Second Life Photography

[Originally posted 19-Mar-2010 here]

Photography is one of the many things I enjoy in SL. At the time of writing I have over 660 pictures on my Flickr account

Torley Linden has a great wiki page on various tips and tricks here:
wiki.secondlife.com/wiki/Snapshot_Help

One trick I use a lot is to take a snapshot using the dialog and then use the mouse-based camera controls to get the angle just right and then refresh it again. There’s a simple tutorial on it here. If you’re into SL photography then it’s a great technique to master.

Something that has annoyed me for ages is the foot shadow. I’m forever trying to correct it in post-production because the invisiprims on a lot of my boots cause the shadow to come out wrong. This problem will start to go away with the new alpha masking for feet in Viewer 2.0 but it will still be around for a while. So imagine my delight (and annoyance that I only just found this out) when I discovered you can turn off the foot shadow!
It’s Advanced menu > Rendering > Features > Foot Shadows
D’oh!

For my next set of photos I’m planning on making use of the depth and object matte capture modes and introducing depth of field in post production. Should be a new challenge for me and I’m really looking forward to it. Watch this space!

Continue reading “Second Life Photography”