Outfit – Creuza Lingerie by Uccman
Jewellery – Butterflies by Avaway
Hair – Ivy by Kuni
The lingerie is currently L$60 for a fatpack which gives a choice of 9 colours (as seen in the background).
There are separate HUDs for colouring the top and the bottom, but no ability to colour the harness parts separately from the non-harness parts, which is a shame.
Likewise the cute bows on the panties cannot be coloured separately, which is a pity as I often like to do a black & red combo with things like these.
There is also a separate HUD labelled “Garter” but this is actually for changing the metals between gold and silver.
There is a string of pearls along the perineum (ie. between the legs), that cannot be re-coloured or hidden.
The heart cut-out on the panties is very cute. However, there is no option to show / hide this. Likewise there is no option to show / hide the ribbons that cover the nipples.
Overall, this is excellent value for money but is really let down by its HUD. It would benefit from a much more fully-realised HUD and feels like rather a missed opportunity as a result.
Recently I bought a lovely vintage cycling outfit called “Velocipedestrienne” by Apricot Paws at The Engine Room event.
(Edit: Tipped off by my friend CC, who is demanding credit. LOL)
Initially I bought the white blouse for L$124 (fatpack was L$414), and the bloomers in burgundy also for L$124, and I also picked up the blouse in wine as a free gift at their mainstore.
However, afterwards I realised that I liked several colours of the bloomers, and contacted Zii Minotaur (the owner of Apricot Paws) and they were more than happy for me to buy the bloomers fatpack at L$414 and to refund me the L$124 that I had spent on the single pack, which was absolutely wonderful of them.
I also wanted some boots to go with the outfit, and I already owned Solvej by Ingenue in Noir, Oxblood, and Walnut, which had cost L$295 each, and I had written myself a notecard at the time saying that I had decided to buy single colours because the fatpack was L$1,500 (a breakeven of 5.02) and that the only other colour I could see myself wanting was Saddle. The Walnut looked too dark (although perhaps might have sufficed) and I thought that I did indeed need the Saddle so bought that.
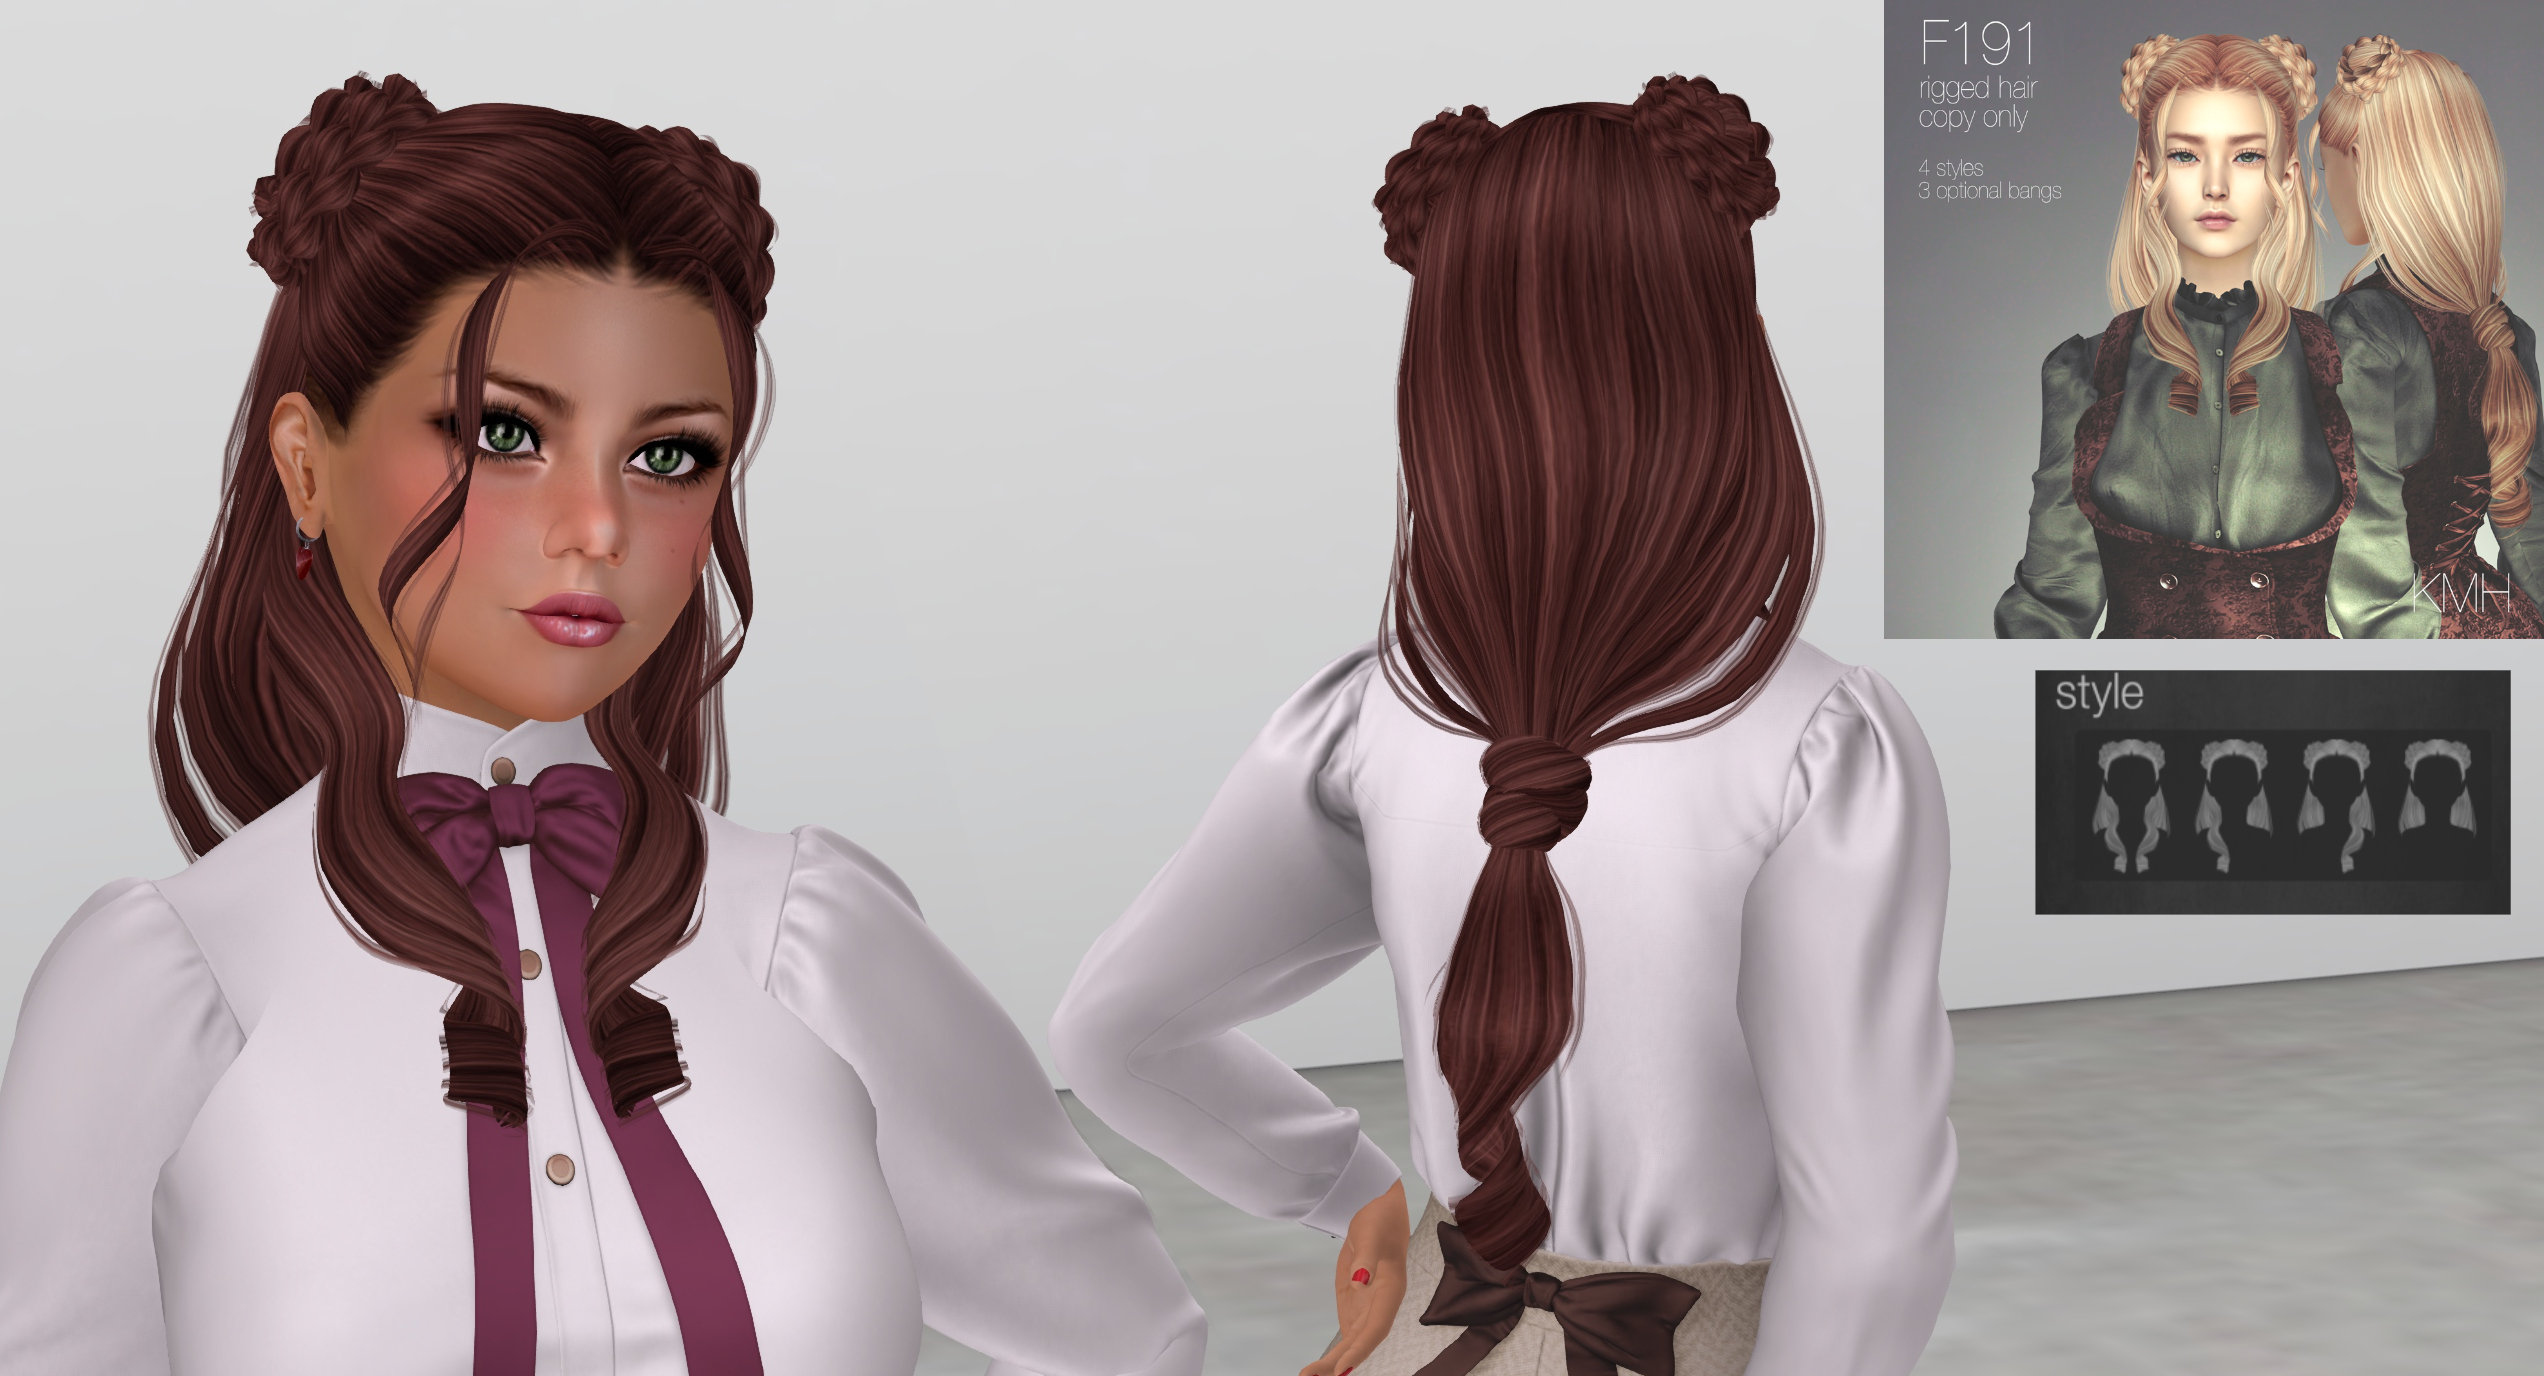
I also wanted some hair to go with the outfit and, as luck would have it, the ideal hair was right there at The Engine Room
The hair was L$325 for the Natural pack. It is Rigged in two sizes, and also comes with three separate Unrigged bangs, and also the HUD allows 4 different style variants. I’m wearing Bangs2 in the pic, and Bangs3 is a wider version, whilst Bangs1 is a straight fringe.
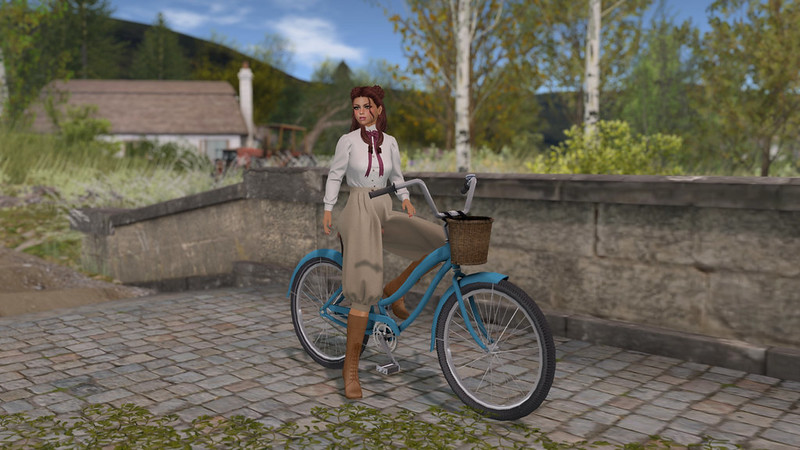
So, with the outfit all done, it was time to look for location and a bicycle.
My first idea was to find a nice sim which had free bicycle rezzers, and the first place I found was Calas Galadhon Park. Whilst it is a lovely sim I wasn’t happy with the sizing of the bicycle (it came in fixed sizes, and I was between sizes) nor was I happy how totally uncontrollable the vehicle-based bicycle was, with it being way too oversensitive.
Taken at Calas Galadhon Park
The picture was fair, and frankly I could have left it there, but I went looking further.
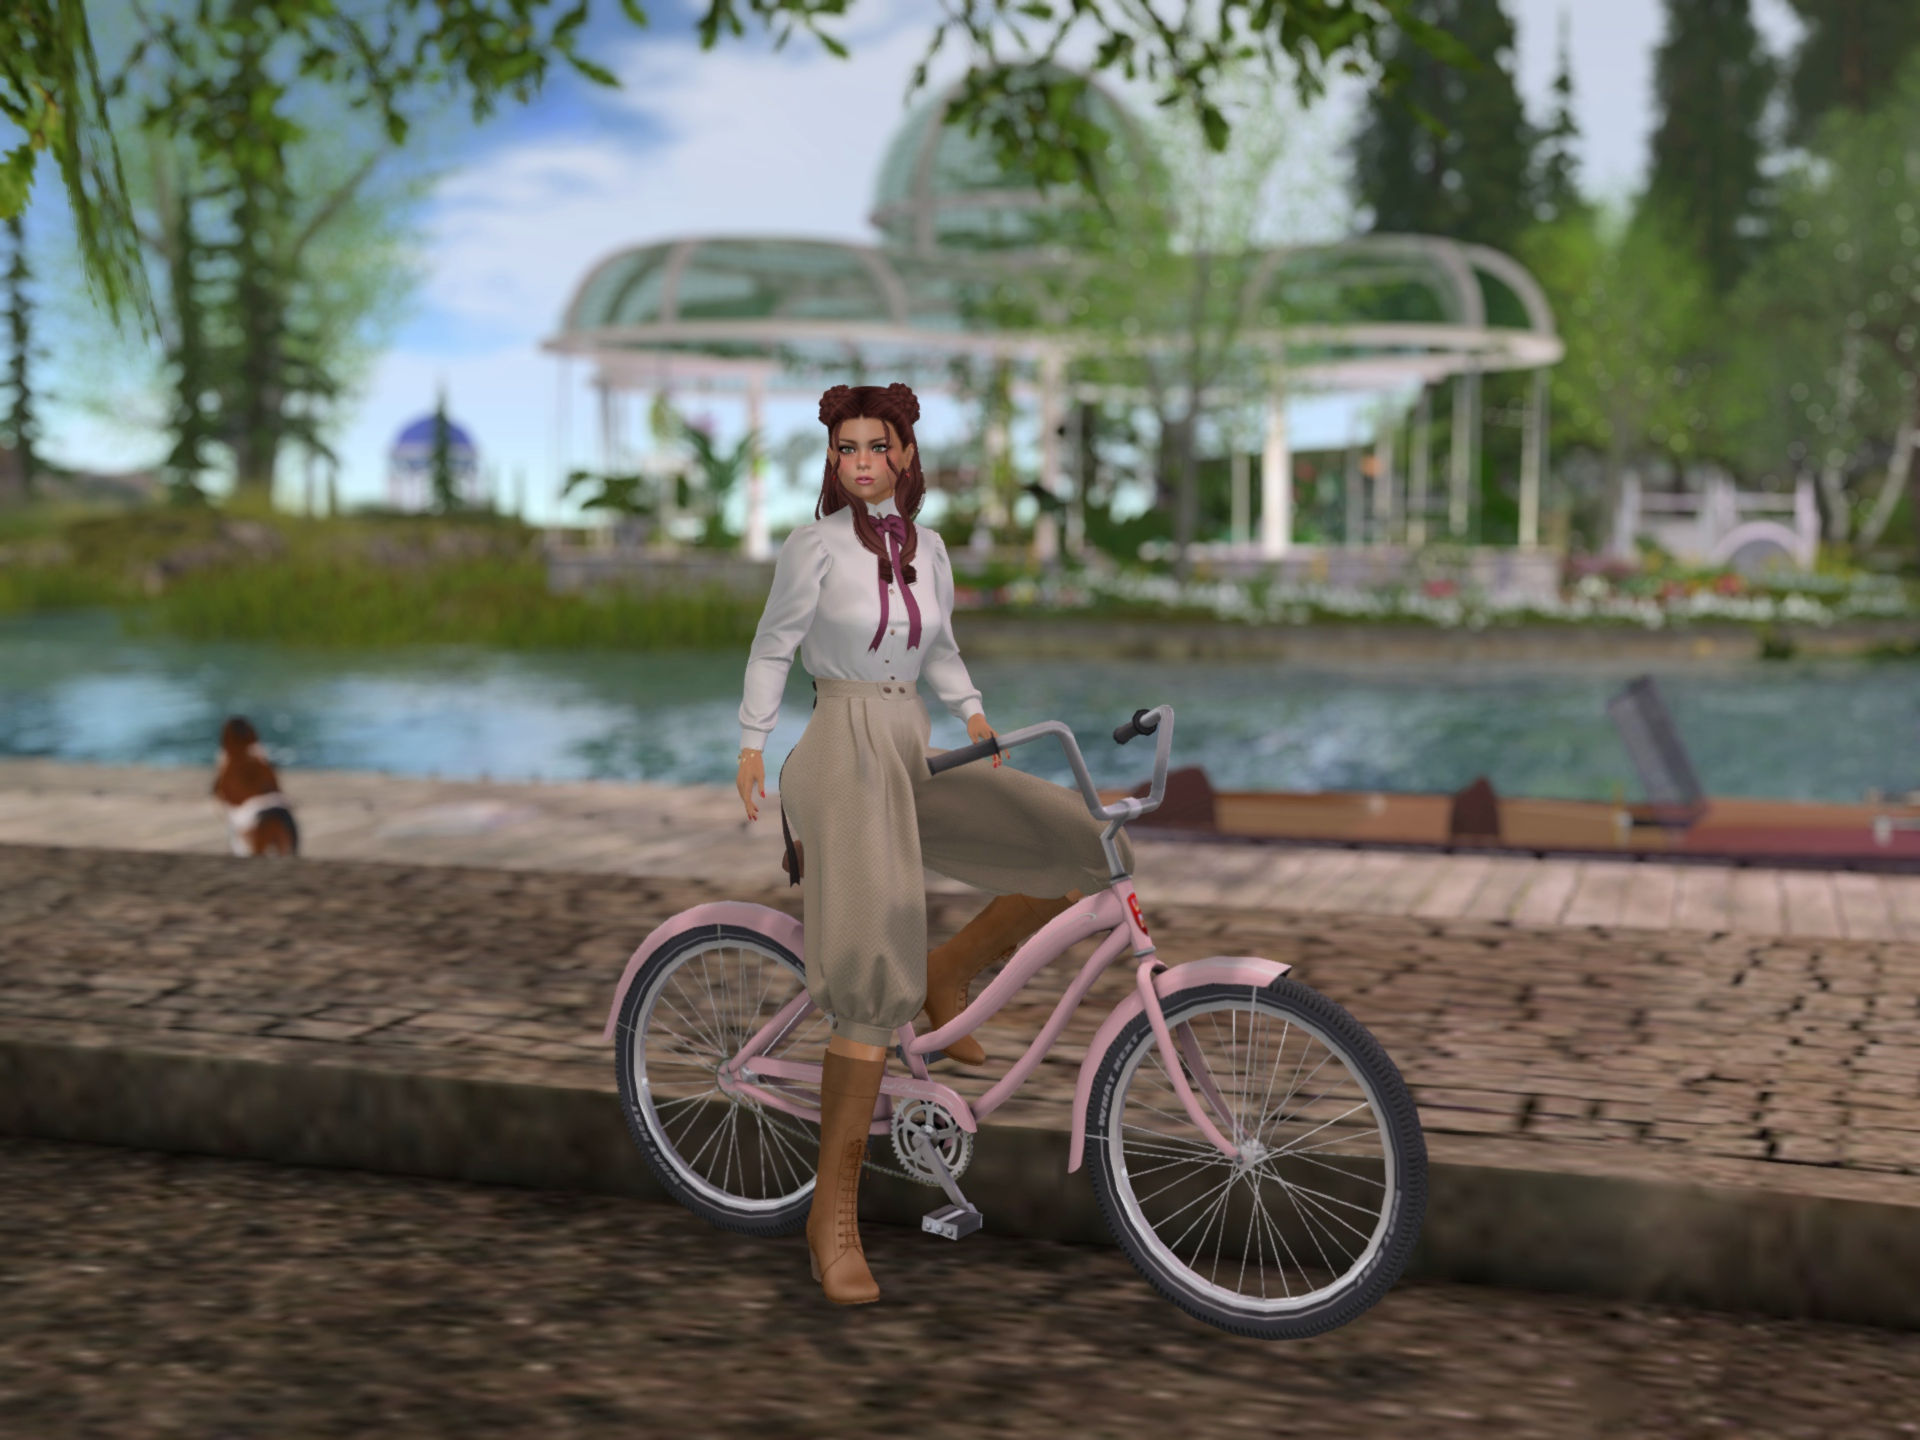
The next place I found was a delightful bicycle-themed cafe called Java Sprockets which has a vendor board giving free “Java Cruiser” ladies bikes.
Java Sprockets
For a freebie, this was actually pretty nice. You rezz it, and then it automatically attaches to you. It rides fairly well, but has fairly poor anims. It has a script which allows you to recolour with a choice of “Cherry Red”, “Lemon Yellow”, “New SL Blue”, “Coffee”, and “Old SL Green”. It also allows for resizing.
With hindsight, a few mins with AnyPose would have come up with a half-decent pose (this is what I managed in 30 secs).
Java Cruiser
Finally I bought the Sonoma bicycle by {what next}, which actually turns out to be who makes the rezzer that I found at Cala Galadhon, only this version you wear as an attachment and it acts like an AO, meaning you can ride it anywhere. It sells for L$249 for a single colour, but I noticed that it is copy-mod so I bought it in Cream and then retextured it to a lovely Bugatti Blue and also made the flowers in the basket transparent because I felt it suited the type of picture I wanted to take rather better.
Where to go for a backdrop? My first thought was the Paris 1900 sim, even though the bicycle is more of a 1950’s style, although I would say the outfit is much earlier. I chose the famous Moulin Rouge as the backdrop.
Taken at Paris 1900
I sent the pic to my sis, Karen, who I know loves that sim, and she suggested that I might like to try Soul2Soul River, which is a gorgeous quintessentially English village, and it was a good suggestion.
Final picture, as published to Flickr
This is the picture I finally settled on because I had to stop somewhere.
I got contacted by Flickr recently (as has every Flickr user) and basically they said (and I paraphrase) “you remember when we said we were going to delete your photos if they went over 1000, unless you paid for Pro? Well we never did. Not a single photo. Only now we might delete your Moderate and Restricted pics if you stay on a Free account”
Well, crap. So I deleted 500-odd historic photos for nothing back when the 1000 pic “limit” [sic] came in? How annoying!
(I still have all the photos backed up on a self-hosted gallery, although all the comments, faves, and views have now been lost, like tears in rain)
I’m more concerned about this new policy on Moderate and Restricted photos though. I have always been fastidious about flagging my more racy pics. I think this new policy will encourage people to sail much closer to the wind on what they post rather than just flagging a photo as Moderate to err on the side of caution, as I have been doing up until now.
Update:
I have been through all my Moderate and Restricted pics and replaced each with a censored version along with a link to the original in my self-hosted gallery.
Update2:
As of September 2023 I am now on Flickr Pro so have undone many of the censored pics. I still feel sad that I’ve lost all that history though.
In my 14+ years on SL this is quite probably the most amazing, most detailed, most immersive sim I have ever visited.
I took loads of photos (over several visits), and since my free Flickr account has a 1000 pic limit, and also since I choose to make my Flickr stream highly curated, I thought it better to create a blog post to feature all the photos. Plus it gives me more freedom to talk you through both my photos and also the sim.
All of the photos are in 1440px height resolution. Do please click on each pic to see it in full resolution, because the large thumbnails just don’t do them justice and this is meant to be a photo gallery!
WARNINGS
This is an Adult sim and some of the following pics may be of an adult nature, although I have chosen to pixelate some of the most sexual content. However, there may be some artful nudity.
I joined Second Life in 2006, and created a Flickr account for my Second Life pics in 2008, and up until Flickr’s new 1000 photo limit came in semi-recently I had photos going right back to the beginning. However, in order to fit in with the new limit I had to delete a few photos.
Not changed between then and now as I haven’t been in SL much, and hadn’t been taking a lot of photos. However, I’ve started taking photos again and want to upload them to Flickr so even more old photos need to go. So I took the brave decision to delete any photo older than 10 years old, no matter how many views, faves, and comments it had.
I now have 419 photos left. I guess I was pretty prolific in the first 2 years!
The photos aren’t gone forever, because they are backed up on a self-hosted gallery here on this domain. But all the faves, comments, and view counts are now lost… like tears in rain.
I finally had the muse on me to pop into Second Life to take some photos. Whilst I was there I bumped into my friend Abby, who I have known almost as long as I have been in SL. She is the owner of the Heroes club (which has been going for 6 years) and also the designer of Heroes Clobber. She’s sadly closing down Heroes and relocating Heroes Clobber, and has asked me to take some photos of the new place. So stay tuned for those!
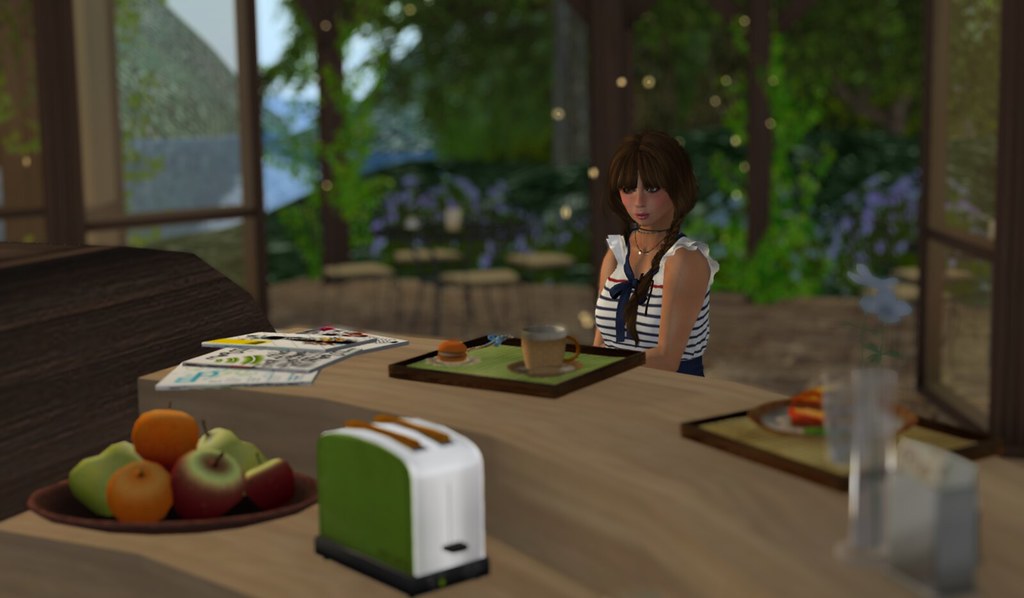
“Breakfast at Tiramisu” on FlickrBefore & After (click to enlarge)
The picture needed quite a bit of post-processing. For a start there was some nasty clipping of my arm against the dress. I noticed this when I took the picture, so to make correcting it easier I took two photos – one with the dress and one without, which allowed me to composite them post-production. What was less easy to solve was the clipping on my left shoulder (your right as you look at it) on the sleeve of the dress, so I had to clone another part of it and fill in. Another thing that needed attention was the colour of the right sleeve (your left as you look at it) which needed to be lightened and blended. There was also some clipping on the hair, which I also corrected. Finally, I got the glow settings wrong on the Depth of Field when I took the picture, and rather than going back and re-shooting, I corrected this post-production.
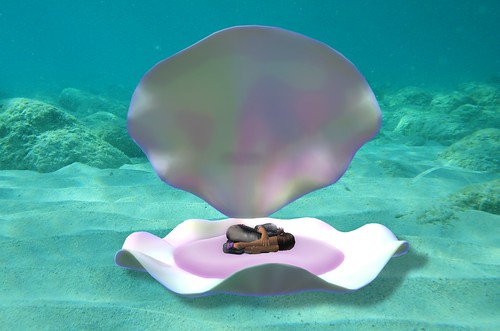
One of the attributes that defines art is that it is open to different interpretation. Art should elicit an emotional response, should engender debate, perhaps even controversy.
By that criteria, this picture is possibly the closest I have come to creating art.
The picture had its genesis in September 2010 when I found the oyster and pose at a Japanese sim. However, whilst I loved the picture that ensued, I never felt that my skills with GIMP were sufficient to do it justice and I posted it pretty much “as is”. However, things have changed a lot since then. For this revisit, I masked out the blue background so that I could add a new one in, used the distort tool to painstakingly push and pull all those horrid straight edges and angles into beautiful curves, sorted out the terrible clipping issues on the girl, and added a shadow to the shell so that it blended in with the new background more.
You can see the original picture here:
Sharing the photo with my friends has provoked some very interesting responses. Apart from the usual (but ultimately dismissive) “well done” or “cool”, I’ve had people perceive cuteness with an “awwwwwwww”, another friend ask me if I was ok, as they saw the girl curled up in the foetal position and interpreted that as her sobbing and trying to shut the world out. Another saw the girl as being precious because pearls are precious.
For me, the latter is most close to what I see. Although I am by no means religious, I am aware that there is a phrase “a pearl of great price”, which derives from one of Jesus’ parables in the Bible (Matthew 13:45-46 according to Wikipedia) which denotes something of great worth that is to be treasured. For me the picture shows the girl as being a pearl of great price, but also very fragile and vulnerable too. Something to be prized, cherished and adored. I also see elements of birth in it, as a pearl is grown inside an oyster like a baby in a womb, so the girl being in the foetal position is appropriate. Of course, there’s also the practical consideration of fitting the girl in the oyster and the foetal position is the most compact!
But what do you think? What does the picture say to you? Do feel free to add what you see by commenting – I’d be really interested to hear.
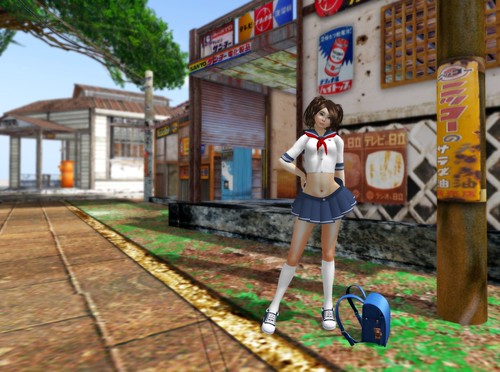
The creativity and ingenuity of the residents of Second Life never ceases to amaze and delight me, and none more so than sims that have beautiful attention to detail and are a visual treat.
I was exploring, looking for Japanese sims for a photo shoot I wanted to do, and came across the simply wonderful Japan Dream Kenjin. This sim is so worth a visit – it’s a seaside fishing town that is just crammed with visual detail and atmosphere.
—
Skin: Sophie by DrLife
Hair: Holly by KeeLee Designs
Outfit & shoes: Hentai Hottie 2.0 (Classic Version) by Danika
Backpack: Randoseru Japanese backpack by House of Curios
I love my digital art, and sometimes I like to mix things up a bit. The foreground is from Second Life, of course, but the background was taken in Crysis: Warhead.
I spent ages on this pic, what with fitting the hair to the beret, finding the pose, doing the snapshots in both SL and Crysis, and then all the post-processing (not least correcting SL’s various clipping issues) . I’m quite pleased with the result.
For reference, the various parts of the outfit are:
Update: Although this is an old article, it is still relevant in 2022!
As many of you know, I’m a keen Second Life amateur photographer with loads of pics on my Flickr photostream and even more on my self-hosted gallery.
Along the way I have picked up a few useful techniques which I will share with you here.
First things first, if you haven’t read SL Wiki guide to high quality photography then you should have a read. Specifically on turning on the High Resolution Snapshots option and also Quiet Snapshots to Disk (which disables that annoying “click-whirr” sound effect that lets everyone know you have taken a pic)
As mentioned in the guide, whilst you can use the Camera Controls window (View -> Camera Controls) to control the camera, it’s very clumsy and imprecise. It is far better to use the mouse camera controls, as follows:
Alt and clicking something focuses it to the centre of the screen.
Alt and dragging the mouse zooms the camera.
Alt+Ctrl and dragging orbits the camera.
Alt+Ctrl+Shift and dragging pans the camera.
That may sound a little complex, but when you get used to it then it is amazingly intuitive and fast. It’s so natural to me now that I don’t even think of it when I use it.
Now, on to my tips.
Shoot from the hip
The first thing I use a lot, and I mean a LOT, is a technique that lets you shoot first and aim afterwards. As a Street Photographer who is always looking to capture that split-second ‘sneak attack’ moment this is really essential.
Take a snapshot using the Snapshot button on the bottom menu bar (on a 1.x Viewer) or use the keyboard shortcut Ctrl+Shift+S (under Windows). This brings up the Snapshot Preview window.
For my technique to work you must have the “Freeze frame (fullscreen preview)” checkbox ticked. And you should NOT have the “Auto-refresh” checkbox ticked.
So, with those checkboxes set up that way, take a snapshot and note that everything seems to be frozen in time. Now, move the camera around using the mouse controls I mentioned earlier… Yay! We have ‘Bullet Time’ from The Matrix!
Use the camera controls to reposition the camera angle so that everything is just how you want it and then click the “Refresh Snapshot” button. You can then save as normal.
Under some circumstances when taking snapshots of people, SL can glitch up and the person can move but all their attachments (including their hair) can stay still and it ruins the snapshot, but it happens rarely enough that this technique is still very useful.
The Dolly Zoom
If you know anything about film, you’ll be wondering what the Dolly Zoom (a.k.a. the “Hitchcock zoom”, “Vertigo effect”, “Jaws shot”, “zoom in / dolly out“, etc.) has to do with stills photography, but bear with me.
If you zoom right in on something in Second Life you’ll notice that everything gets a bit distorted and perspective is altered.
Now, not many people know that there are additional zoom controls accessed with the keyboard shortcuts Ctrl+0 (to zoom in) and Ctrl+8 to zoom out. Ctrl+9 resets it to normal.
One or two presses of Ctrl+0 will correct the distortion.
But there is more! And this is where the Dolly Zoom effect comes in. If you get a bit more extreme and press Ctrl+0 a few more times and then pull back with the Camera Controls (Alt+mouse as previously mentioned) then you get the characteristic foreshortening effect. This can give you some really interesting effects.
Don’t forget that when you are done to use Ctrl-9 to reset to normal.
We use cookies on our website to give you the most relevant experience by remembering your preferences and repeat visits. By clicking “Accept All”, you consent to the use of ALL the cookies. However, you may visit "Cookie Settings" to provide a controlled consent.
This website uses cookies that are essential for the working of basic functionalities of the website and its security.
We have not explicitly installed any data-tracking plugins and have not, for example, added Google Analytics code to this website.
Necessary cookies are absolutely essential for the website to function properly. These cookies ensure basic functionalities and security features of the website, anonymously.
Cookie
Duration
Description
cookielawinfo-checkbox-advertisement
1 year
Set by the GDPR Cookie Consent plugin, this cookie is used to record the user consent for the cookies in the "Advertisement" category .
cookielawinfo-checkbox-analytics
11 months
This cookie is set by GDPR Cookie Consent plugin. The cookie is used to store the user consent for the cookies in the category "Analytics".
cookielawinfo-checkbox-functional
11 months
The cookie is set by GDPR cookie consent to record the user consent for the cookies in the category "Functional".
cookielawinfo-checkbox-necessary
11 months
This cookie is set by GDPR Cookie Consent plugin. The cookies is used to store the user consent for the cookies in the category "Necessary".
cookielawinfo-checkbox-non-necessary
1 year
Set by the GDPR Cookie Consent plugin, this cookie is used to record the user consent for the cookies in the "Non-necessary" category .
cookielawinfo-checkbox-others
11 months
This cookie is set by GDPR Cookie Consent plugin. The cookie is used to store the user consent for the cookies in the category "Other.
cookielawinfo-checkbox-performance
11 months
This cookie is set by GDPR Cookie Consent plugin. The cookie is used to store the user consent for the cookies in the category "Performance".
CookieLawInfoConsent
1 year
Records the default button state of the corresponding category & the status of CCPA. It works only in coordination with the primary cookie.
DYNSRV
session
This cookie is used for load balancing purposes to decide which server to send the visitor.
viewed_cookie_policy
11 months
The cookie is set by the GDPR Cookie Consent plugin and is used to store whether or not user has consented to the use of cookies. It does not store any personal data.
Any cookies that may not be particularly necessary for the website to function and is used specifically to collect user personal data via analytics, ads, other embedded contents are termed as non-necessary cookies. It is mandatory to procure user consent prior to running these cookies on your website.
Functional cookies help to perform certain functionalities like sharing the content of the website on social media platforms, collect feedbacks, and other third-party features.
Performance cookies are used to understand and analyze the key performance indexes of the website which helps in delivering a better user experience for the visitors.
Analytical cookies are used to understand how visitors interact with the website. These cookies help provide information on metrics the number of visitors, bounce rate, traffic source, etc.
Cookie
Duration
Description
CONSENT
2 years
YouTube sets this cookie via embedded youtube-videos and registers anonymous statistical data.
Advertisement cookies are used to provide visitors with relevant ads and marketing campaigns. These cookies track visitors across websites and collect information to provide customized ads.
Cookie
Duration
Description
VISITOR_INFO1_LIVE
5 months 27 days
A cookie set by YouTube to measure bandwidth that determines whether the user gets the new or old player interface.
YSC
session
YSC cookie is set by Youtube and is used to track the views of embedded videos on Youtube pages.
yt-remote-connected-devices
never
YouTube sets this cookie to store the video preferences of the user using embedded YouTube video.
yt-remote-device-id
never
YouTube sets this cookie to store the video preferences of the user using embedded YouTube video.