Posted in Second Life, tips, Viewers

Oh no! I deleted half my house! (and other disasters)


[NOTE: This is very out of date now that we no longer have prim link sets and most things are mesh instead]

A friend recently IMed me with exactly that. And, to be fair, most of us have been there. But don’t panic, and all is not lost.

Likewise do not panic if you accidentally moved something. Or if you rezzed something and exceeded your prim count and half your house got returned to you instead (that happened to me once), or your landlady had a blonde moment and returned half your stuff (happened to me also).

Here are some handy hints on what you can do in each circumstance.


You moved something

If you’ve moved something by accident the first thing you should do, if your Viewer supports it, is to hit Ctrl-Z which is the shortcut key for “undo”. Very often this will snap things back exactly as they were.
Phoenix and Firestorm both have this functionality, and doubtless many other Viewers do too.

However, this does not always work. So you will have to move it back manually. Now your first inclination will be to grab the object and start dragging it around but this is the worst thing you can do as, trust me, you will not get it back to exactly where it was. Oh, sure, it may be “good enough” and that’s fine. But then you wouldn’t be reading this if you were happy with just that. Besides, in the case of segments of a house it will not look right unless correct down to the smallest decimal point.
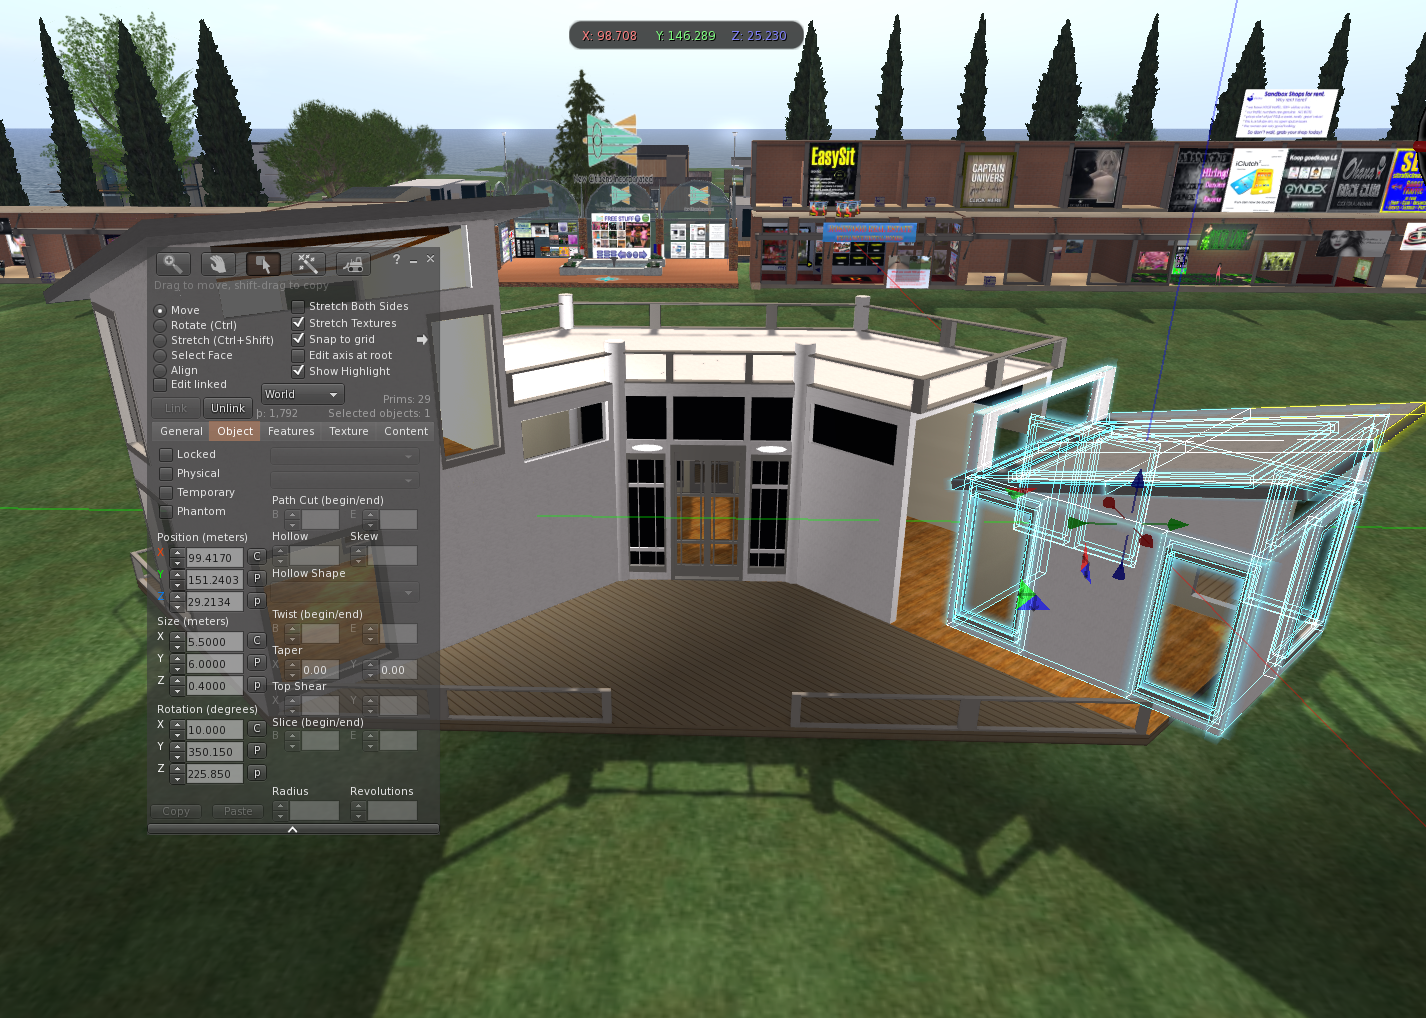
What you need to do it right-click on the object, select Edit, and then choose the Object tab. If you look at the screenshot above you can see what I mean. I was running Firestorm Viewer so if you’re using a different Viewer it might look slightly different.
If you look on that you’ll see all the numbers for the exact placement of the object. Now, with some rezzboxes (the box that rezzed your house) they add the exact position co-ordinates of when they were rezzed to the description field. So if that’s the case then you’re sorted as you can manually set them back to the correct value. They will very likely write the X, Y and Z values as , eg. <105.83778, 146.98111, 35.75515>
If not, you may be able to deduce the settings by looking at surrounding objects. This is often hard though.
One sure-fire way, albeit rather tedious, is to rezz a copy of the house (you may need to go to a sandbox if you have insufficient prims to do that) and examine the values of the offending segment and also those of an adjacent one, and with some very simple maths deduce the offset of one to the other. Then return to your proper house and apply the same offsets, thus returning the moved segment to its correct position. So if, for example, SegmentA is at 100,100,100 and Segment B is at 100,110,100 on the new house, and on the proper house SegmentA is at 200,200,100 then SegmentB should be at 200,210,100 because there is an offset of 10 on the Y co-ordinate.
I find that using a simple spreadsheet to do this helps enormously. If there is enough demand I could make one available.

Finally, prevention is better than cure. Once you have things back the way you want, be sure to lock the object. All this does is mean you can’t accidentally move it again until you unlock it; it’s just like the safety catch on a gun. You’ll find a tick box to lock & unlock objects on the same tab as all the numbers we’ve been looking at – it’s called “Locked”.


You deleted something

First thing to do is to find it in your inventory, and it will be in your Trash.
Note the name of the object, then right-click on it and choose “Restore” to undelete it. Do NOT click “Purge”!!
Then find the object again (searching for it by name if necessary) and see what menu options are available. On some Viewers there is the option to “Restore to last position”. Phoenix and Firestorm definitely have this, and I’m sure many other Viewers do too. If that is the case then use this option and you will very likely find the object restored to its correct place. However, I disclaim all responsibility if for some reason it doesn’t, especially if it is a no-copy item that disappears into the far blue yonder never to be seen again. You have been warned.
The other option is to just rezz the object in approximately the correct place and then use the techniques mentioned earlier for moved objects (although obviously not the first one to do with “Undo”)


You had something returned

First thing to do is to find it in your inventory, and it will be in your Lost & Found. Something worth bearing in mind is that if a large number of objects are returned to you, SL may package them up. You will find what looks like just one of your objects but it will have an icon that looks like a pile of building blocks rather than the normal icon for an object which is a box. Rezzing this will rezz all the returned objects inside the package, although possibly in the wrong place. But at least they will be rezzed in the correct relative positions to each other so it should be a case of calculating the offset to their correct position (as I outlined earlier) and then moving them.
However, if it is just one object, and not a package, then use the same technique as outlined above for deleted objects.

Posted in Exploring, General, Second Life

Lest we forget

Lest we forget
Lest we forget

My friend Rorrim Wrigglesworth has built this wonderful Garden of Remembrance, which includes The Cenotaph.

Please do visit it to pay your respects. It is located at RoBeck land in Second Life (click here for SURL)

The Two Minute Silence is at 11:00am 11th Nov 2011 (UK time, which is 3am SLT/PST) and Remembrance Day will be on Sunday 13th Nov this year.

www.britishlegion.org.uk/remembrance/the-nation-remembers/remembrance-sunday
www.bbc.co.uk/news/11734920
en.wikipedia.org/wiki/Remembrance_Day

They shall grow not old, as we that are left grow old:
Age shall not weary them, nor the years condemn.
At the going down of the sun and in the morning,
We will remember them.

Update: I was at the Garden of Remembrance for the Two Minute Silence, and was very moved that there were 11 other people there at the appointed time (11am UK time).
We were all silent and then just after 11.02am somebody said something appropriate. I added the quote in italics above and someone immediately echoed “We will remember them” (which is the correct and traditional response).
A few more very appropriate things were also said.

It doesn’t sound much, but it was very moving and very special. Possibly the most special thing I have experienced in my 4 years on Second Life.

Posted in Exploring, Fashion, Photography

Konnichiwa


Konnichiwa, originally uploaded by Becca Ashbourne.

The creativity and ingenuity of the residents of Second Life never ceases to amaze and delight me, and none more so than sims that have beautiful attention to detail and are a visual treat.

I was exploring, looking for Japanese sims for a photo shoot I wanted to do, and came across the simply wonderful Japan Dream Kenjin. This sim is so worth a visit – it’s a seaside fishing town that is just crammed with visual detail and atmosphere.

Skin: Sophie by DrLife
Hair: Holly by KeeLee Designs
Outfit & shoes: Hentai Hottie 2.0 (Classic Version) by Danika
Backpack: Randoseru Japanese backpack by House of Curios

Posted in Fashion, Flickr, General, Opinion, Second Life, Viewer 2.x

Mesh

Slink Mesh Boots!!, originally uploaded by Nana Minuet.

I have to say I was getting very excited by Mesh, especially with the recent announcement that Phoenix is going to be supporting it (thanks to some dedicated work by Henri Beauchamp of the Cool Viewer).

These boots are a great case in point – imagine how wrong the knees would look in that pose if those were sculpt boots!

However, all is not as good as it seems; I’ve learned that the current implementation of Mesh is worse than useless, for clothes at least. It would seem that a mesh object attaches to your skeleton, not your “flesh”, and cannot be resized in-world. That means that if you are slim like the model in the above pics, those boots would look great. However, if you are any other size than her they won’t fit. Oh, sure, an alpha layer will mask out the bits of you that the boots cover but if you have bigger thighs than her you’re fresh out of luck.

One of the biggest benefits of Second Life is you can be who you want to be. You (or, rather, your avatar) can be exactly as you want it – it’s the overriding expression of your individuality and what makes Second Life so wonderful. But if Mesh clothing is going to force us all to resize our avatar to the clothing, rather than the clothing to the avatar, then this is a bad thing.

There is a JIRA running on this. It’s rather technical but the gist of it is “change Mesh to resize to your flesh not be fixed size and attached to your skeleton”.
See https://jira.secondlife.com/si/jira.issueviews:issue-html/SH-2374/SH-2374.html

Posted in Emerald, General, Imprudence, Phoenix / Firestorm, Second Life, Viewers

Killer features (Imprudence & Phoenix)

What I like the most about Third Party Viewers such as Imprudence and Phoenix is that they are developed by people who actually use Second Life and so have features that, whilst they may not grab the headlines, are genuinely useful. As an aside, I think it’s pretty clear that the developers at Linden Lab who developed Viewer 2.x don’t, but that’s not the subject of this entry.

This is a roundup of what I consider to be genuinely useful features. It’s by no means an extensive or all-inclusive list.

Imprudence

Profile groups
When viewing your profile, groups that you have hidden from public view are shown greyed out, giving you an idea of how your profile will appear to others.

Communicate window
When new IMs come in, the title bar of the ‘communicate’ menu updates to say how many are unread. My friend Mariana actually ported this to Phoenix and submitted it as a patch and it was rejected as the person who rejected it didn’t see it as being useful, which was a shame as I think it is.

Group chat
You can suppress Group Chat for individual groups. This is just so useful for those busy groups where people just can’t STFU in group chat but you still want to receive group notices.

Radar
The client-side radar / Avatar List is very compact and hung off the bottom of the Mini-Map. I actually really like this as it is very compact and can be up all the time, unlike the Phoenix one which takes up too much screen space to be up all the time.

Phoenix

Intra-sim teleports even when there is a Landing Point
By this I mean teleports that take place within a sim, rather than when teleporting into a sim from another sim.
Sim Owners have long been able to set a Landing Point to dictate where you land when entering their sim. I can see the value of it, as it means people are forced to rez near a rules giver, or a prim notice, or a shop display, or the starting point on a tour, or whatever. But when you are already in a sim, is it still necessary? I don’t think so. In fact it is really, really annoying when you want to cam around a large shop (for example) and then TP to where your camera view is to get closer to a vendor board, or the like. Most Third Party Viewers allow you to double-click teleport, but often you fall foul of the Landing Point and get an unhelpful message saying you are unable to TP closer than where you are. Or, worse, you get zapped back to the Landing Point.
However, there is an option in Phoenix when using the LSL Client Bridge to use llMoveToTarget for double-click TPs and this zips you straight to where you double-click even if this sim has a Landing Point. It does this because llMoveToTarget is a script command used to move things around rather than a teleport as such, so isn’t restricted by the Landing Point rules. For me this is the killer feature as it is just so useful for enabling me to shop in a large store the way I want to.

Aspect ratios on textures
As I’ve blogged about before [link], Second Life stores pictures (textures) in squares, or rectangles made of squares, and unless the Aspect Ratio exactly matches that of the texture it’s going to be distorted. With most Viewers you have to stretch the texture till it looks right.
Phoenix adds a useful little drop-list at the bottom of a texture view to let you tell it what Aspect Ratio it should be. So for a 16:9 picture stored in a texture you can send it to a friend and, provided they are using Phoenix, tell them in IM “you’ll need to view that at 16:9”. They set the drop-list selection to 16:9 and ‘hey presto’ the picture looks right. Useful!

Profile pictures
This one has been around since the Emerald days. When there is a picture in a Profile (wherever it appears) you can pop it out into its own window and view it actual size (which will be bigger than it is being displayed at in the Profile). Of course the Aspect Ratio may then be wrong and you might need to refer to the above and also my blog post on Profile pic aspect ratios [link]

Prim manipulation – cut & paste values
One for the builders and tinkerers amongst us. Phoenix has a really useful feature where you can copy the size, rotation, etc. of a prim and paste it to another. It saves you having to individually highlight and copy each value for x, y & z and paste it into the same box on another prim.
It’s easy to miss this feature, but if you look next to the values you’ll see little buttons marked “c” for copy and “p” for paste.

Prim manipulation – linked prims
Following on from the above, there are also useful buttons for linking / unlinking prims when editing parts of a linked prim set. There is also functionality for moving through a linked prim set.

Autocomplete for names in chat
Finally, a useful little feature for open chat. If you type part of someone’s name you can hit the tab key and Phoenix will try and complete if for you based on who is in chat range.

It’s a shame that Phoenix is now in a maintenance phase, with no planned new functionality, because I would love to see the features I mentioned for Imprudence brought into Phoenix. However, I have it on good authority from one of the Lead Developers that this is not going to happen.

Posted in Fashion, Flickr, Photography, Second Life

Mixing it up

I love my digital art, and sometimes I like to mix things up a bit. The foreground is from Second Life, of course, but the background was taken in Crysis: Warhead.

I spent ages on this pic, what with fitting the hair to the beret, finding the pose, doing the snapshots in both SL and Crysis, and then all the post-processing (not least correcting SL’s various clipping issues) . I’m quite pleased with the result.

For reference, the various parts of the outfit are:

  • Skin: Tess by Laqroki
  • Eyes: Laqroki
  • Hair: Hunter by Magika (customised by me)
  • Beret: British Para beret by SA Quartermaster
  • Top: Jungle Camo Tank Top by Reasonable Desires
  • Trousers: Woodland Camo Pants by Breach
  • Boots: 9″ Combat by Adi Cat Designs
  • Hand gun: Heckler & Koch USP by Breach
  • Rifle: part of the background
  • Background: Crysis Warhead

Dog Tags are from the SL Library

Posted in Imprudence, Opinion, Phoenix / Firestorm, Second Life

Is Imprudence withering on the vine?

I like Imprudence. I’ve been using it for 3 months now and I feel very attached to it. But I think the time is approaching when I’m going to have to look to other Viewers, with Phoenix as a prime candidate.

Why is this? Well, one reason is that there is a show-stopper of a bug in v1.3.0 which is forcing me to continue to use an earlier Release Candidate (RC3) as it directly affects my photography.
Imprudence v1.3.0 was released in early October (ie. 2 months ago) and around a month ago this bug was fixed, along with Jacek commenting that it should provoke an immediate v1.3.1 due to the severity of it. However, this has not happened and I’m unwilling to adopt a beta release to get this fixed.

However, for me, the writing is on the wall for two very significant reasons. One is that there have been no releases at all for several weeks, not even Experimental releases, suggesting that the development team are spending all their time on Kokua (the new Viewer based on SL 2.x) at the expense of Imprudence. And the other is the thorny issue of Multiple Attachments.

The developers of Imprudence have always been quite bullish about multiple attachments, stating that they would not support Emerald’s “hacky” multiple attach point code, not even to properly render avatars being run by people using Phoenix (despite it being easily added to Imprudence by simply updating a single XML file as it turns out) because they were going to support the “proper” Multiple Attachments of SL 2.x by back-porting it.
Well, a couple of days ago a new version of Phoenix was released that supports just that, whilst Imprudence still does not.

This, to me, says that Phoenix is still actively being developed and supported and Imprudence is withering on the vine and is not. It also feels as rather an egg-on-face moment for Imprudence (in my humble opinion).

As I said, I really like Imprudence, but I feel like it is being left further and further behind by Phoenix and eventually I’m going to have to jump ship.

Sorry, Imprudence. It’s been nice knowing you.

Posted in Photography, Second Life, tips

Second Life Photography tips

Update: Although this is an old article, it is still relevant in 2022!

As many of you know, I’m a keen Second Life amateur photographer with loads of pics on my Flickr photostream and even more on my self-hosted gallery.

Along the way I have picked up a few useful techniques which I will share with you here.

First things first, if you haven’t read SL Wiki guide to high quality photography then you should have a read. Specifically on turning on the High Resolution Snapshots option and also Quiet Snapshots to Disk (which disables that annoying “click-whirr” sound effect that lets everyone know you have taken a pic)

As mentioned in the guide, whilst you can use the Camera Controls window (View -> Camera Controls) to control the camera, it’s very clumsy and imprecise. It is far better to use the mouse camera controls, as follows:

  • Alt and clicking something focuses it to the centre of the screen.
  • Alt and dragging the mouse zooms the camera.
  • Alt+Ctrl and dragging orbits the camera.
  • Alt+Ctrl+Shift and dragging pans the camera.

That may sound a little complex, but when you get used to it then it is amazingly intuitive and fast. It’s so natural to me now that I don’t even think of it when I use it.

Now, on to my tips.

Shoot from the hip

The first thing I use a lot, and I mean a LOT, is a technique that lets you shoot first and aim afterwards. As a Street Photographer who is always looking to capture that split-second ‘sneak attack’ moment this is really essential.

Take a snapshot using the Snapshot button on the bottom menu bar (on a 1.x Viewer) or use the keyboard shortcut Ctrl+Shift+S (under Windows). This brings up the Snapshot Preview window.
For my technique to work you must have the “Freeze frame (fullscreen preview)” checkbox ticked. And you should NOT have the “Auto-refresh” checkbox ticked.

So, with those checkboxes set up that way, take a snapshot and note that everything seems to be frozen in time. Now, move the camera around using the mouse controls I mentioned earlier… Yay! We have ‘Bullet Time’ from The Matrix!
Use the camera controls to reposition the camera angle so that everything is just how you want it and then click the “Refresh Snapshot” button. You can then save as normal.

Under some circumstances when taking snapshots of people, SL can glitch up and the person can move but all their attachments (including their hair) can stay still and it ruins the snapshot, but it happens rarely enough that this technique is still very useful.

The Dolly Zoom

If you know anything about film, you’ll be wondering what the Dolly Zoom (a.k.a. the “Hitchcock zoom”, “Vertigo effect”, “Jaws shot”, “zoom in / dolly out“, etc.) has to do with stills photography, but bear with me.

If you zoom right in on something in Second Life you’ll notice that everything gets a bit distorted and perspective is altered.
Now, not many people know that there are additional zoom controls accessed with the keyboard shortcuts Ctrl+0 (to zoom in) and Ctrl+8 to zoom out. Ctrl+9 resets it to normal.

One or two presses of Ctrl+0 will correct the distortion.

But there is more! And this is where the Dolly Zoom effect comes in. If you get a bit more extreme and press Ctrl+0 a few more times and then pull back with the Camera Controls (Alt+mouse as previously mentioned) then you get the characteristic foreshortening effect. This can give you some really interesting effects.

Don’t forget that when you are done to use Ctrl-9 to reset to normal.

Posted in General, Imprudence, Phoenix / Firestorm, Photography, Second Life, tips, Viewer 2.x, Viewers

Profile pics and profile Picks (a tutorial)

A lot of people who have made their own picture for their Profile find that it appears squashed or stretched. There is a very good reason for this and it is fairly straightforward to work around. The aim of this post is to try to explain how.

Before I go any further though, do bear in mind that this whole tutorial is all to do with 1.x Series Viewers (ie. official Viewer up to 1.23.5 and most Third Party Viewers such as Imprudence, Phoenix, Emergence, and the like) since Linden Lab in their infinite (lack of) wisdom changed it for Viewer 2.

The key thing to remember with textures (which is the name Linden Lab uses to refer to anything that looks like a picture, which includes snapshots) is that they are always square or else rectangles made up of squares. And those squares are always powers of 2. So a texture can be 256×256 pixels, 512×512, 1024×1024, 512×1024, 512×256, etc. – you get the idea. The maximum size allowed in any one direction (in Second Life) is 1024.
If a picture does not fit into one of these combinations then it is stretched or squashed accordingly, and this is where the deformation comes from.

You would think that you should be able to just take a snapshot in-world and use it, however this is not the case because the Profile picture, and the picture used in the Picks section of your profile, have specific aspect ratios which are clearly defined by Linden Lab [link]. For your Profile pic this aspect is 4:3, and for a Profile Pick this is 16:9 (for 1.x Viewers. For 2.x Viewers LL changed it to 1:1 and 8:5/5:3 respectively. Don’t even get me started on why the Picks have two aspect ratios in the 2.x Viewer).
If you’re unsure what I mean by “aspect ratio” then please refer to [this link].
Unless you can somehow capture your in-world snapshot at something close to the correct ratio, then it’s not going to look right.
(I should note at this point that the RL pic in your profile has a 1:1 ratio, which since it is square is so trivially easy to do that I won’t mention it further)

So, how do you get it right? Well, provided you are happy to do a little bit of simple post-production then it is quite easy.
In order to do it you’ll need a photo editing application such as Photoshop, GIMP, Paint.net or even an online service like Picnik. All except Photoshop are free so don’t be worried if you don’t have one of them. I’ll leave it to you to choose what to use. I use GIMP myself, because it is almost as powerful as Photoshop but is free and Photoshop is very expensive. However, if you are a beginner then paint.net is a lot easier and more intuitive.

First you’ll need to take your snapshot in Second Life. Take a snapshot, but instead of saving it in-world, save it to your hard drive.
In v1.x viewers then this can easily be done with the Snapshot dialog, assessed with the “snapshot” button on the bottom toolbar (or the Ctrl-Alt-S keyboard shortcut if you’re using Windows). There is a radio button under ‘Snapshot destination’ at the top of the dialog, one option of which is “Save to your hard drive”.
You can also use “Snapshot to Disk” from the File menu.
Save the snapshot to somewhere that you can find it again shortly.

If you already have a snapshot in-world which you want to use then it is possible to save it locally and use it. Provided it has full permissions, you can open it and then choose “File -> Save Texture As” from the top menu (which is slightly counter-intuitive as you might reasonably expect it to be a menu on the window of the snapshot itself)

Now fire up your photo editing software and open the picture you just saved (regardless of which of the above two methods you used to create it).
Select the crop tool and fix the aspect ratio. In GIMP this is a checkbox on the crop tool and an edit box to specify the ratio. Your mileage my vary.
For a Profile pic you’ll want 4:3 and for a Pick you’ll want 16:9.
Don’t worry at this point what the final image size is because we will be resizing it.

Crop the picture to the correct ratio. It’s up to you how you want this to look, and it depends on your picture, but do remember that when someone looks at your profile the picture can look quite small. So, for your main profile pic at least, I find it is best to close crop and get your face quite dominant in the picture since your Profile picture is meant to be about you. However it’s entirely your call, of course.

Now, this is the important bit; the trick that this whole entry is about is coming up. You want to resize the picture so that it looks squashed, so that when SL uses it and stretches it, it regains its correct Aspect Ratio. Sneaky, huh?
You can do this in one step, but I like to do it in two steps as it makes more sense to me.
Resize your picture, preserving the aspect ratio. You’ll want to set the height of the picture to be either 512 or 1024 and let your software work out the width.
You’ll notice that the picture still looks right. Which is what we want.
Now the sneaky part – size the picture again but this time turn off keeping the correct aspect ratio. In GIMP this is a little icon of a chain between the height and width. Now set the width to be the same as the height. Do not change the height.
Your picture will now look squashed. Don’t worry, this is fine!
Save your picture – I’d recommend to a different filename.

Now, we need to get the picture back into SL as a texture.

Fire up your SL Viewer and, when ready, upload your edited picture (it’s under the File menu). It will cost you L$10 to do this. It’ll probably end up in the Textures folder of your Inventory.

Finally, edit your profile and drag the texture (ie. your uploaded picture) onto the appropriate picture box of the profile. Or, alternatively, double-click on the picture box and browse for it.

Hopefully your picture will look correct again – it will have been stretched out to the correct aspect ratio again. If it has not you’ve probably used the wrong ratio for the wrong box. Remember, for your main picture it should be 4:3 and for a Pick it should be 16:9
Also, bear in mind that it will only look right on 1.x Viewers since Viewer 2 uses different ratios.

That’s it! I hope that this was useful to you.

Posted in General, Opinion, Second Life

Is “take it or leave it” a choice?

Linden Lab published a revised Terms of Service today.

I started reading through it then stopped, because really the only choices open to me were to accept it or to not use Second Life any more. It occurs to me that the “I accept” checkbox should really have been labelled “I accept. Like I have a choice” and been checked by default.

I’m sure other commentators will be along to tell us just how bad it really is. 🙂